Discounts
SP-1 is a pretty powerful program. One of the things that makes it so powerful is the flexibility on the little things. I thought it would be beneficial to cover the different ways you can setup a discount in SP-1.
This blog was inspired by a conversation with Mark at Blackstone Pizza in Iron Mountain MI. Mark had some questions on how to manage discounts with his employees.
First, remember that you can have unlimited discounts in SP-1. Each discount can be setup to only discount a specific item at a specific time and a specific day! So, you can actually setup a discount that would give 10% off sandwiches on Tuesdays between 2pm and 4pm. That discount would only work at that time.
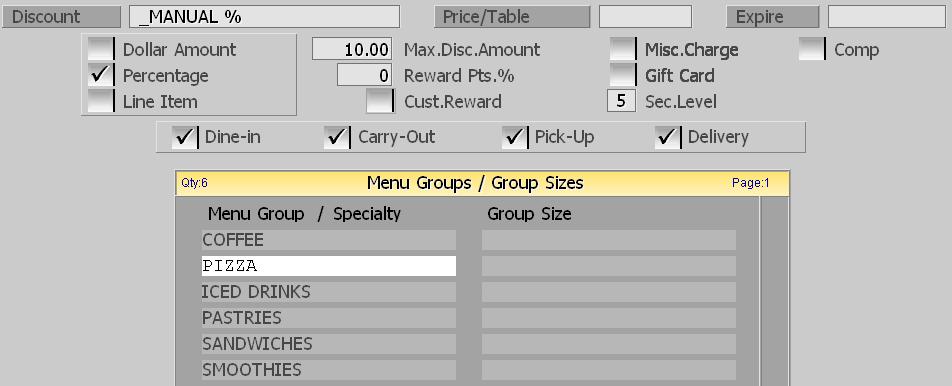
I’ve included a screen shot of a discount that we use in our demonstrations:
All discounts in SP-1 are a dollar or percentage off an item or items. Let’s cover some of these fields and see how they work.
Discount: This is the discount name that is used. This is how the discount is identified on reports and on the order screen when it is used.
Price/Table: Enter a price ($10.00) or price table in this field. If you use a price table, you can limit the discount to certain times of the day or even days of the week. There are three ways this works:
1) Percentage discount – the amount entered here is a percent.
2) If you are setting this up as a dollar amount discount then this will be the amount that the discount is for.
3) If this is left blank, then it is a manual discount. Manual discounts require the employee to enter the amount to be discounted. Usually not something that you want to leave without a security level.
Expire: This discount will no longer be available 30 days after this date.
Dollar Amount: Select this to have a dollar amount discount. If you had entered $10.00 into the Price/Table field, then this would be a $10 off discount.
Percentage: If this is selected, SP-1 will use this as a percentage discount. If you had entered $10.00 into the Price/Table field, then this would be a 10% discount.
Line Item: Line item is a special percentage that will only apply to one specific item on the ticket. This is a great way to discount a specific item in the case of a mistake.
Max.Disc.Amount: With this, you can enter the MAXIMUM amount an employee can discount! In the example above, you can enter any discount amount up to 10%. It’s a great way to limit what employees can discount.
Reward Pts.%: Setting this to zero means that any items that are discounted are excluded from the rewards! This stops “double dipping” for those of you doing buy 10 get 1 free programs.
Cust.Reward: Select this if this is a reward discount. Reward discounts are used with the free gift and loyalty system included with SP-1.
Misc.Charge.: Can you discount a miscellaneous charge.
Gift Card: Can you discount a gift card sale. This is very powerful as it allows you to be able to discount gift or pre-paid cards that customers purchase.
Security Level: Yes, you can password protect discounts. This is important so employees don’t use discounts they are not supposed to use.
Comp: This will allow you to setup a specific discount that is used to ‘comp’ a customer. This discount option affects your server and delivery close outs as well.
Dine In / Carry-Out / Pick-Up / Delivery: These switches set the discount to be order type specific. If you want a carry out only discount, this is how you would do it!
Menu Items: This is where you specify, exactly, what items are allowed in this discount.
Don’t hesitate to tell us how you use your discounts or if you have any comments!
